
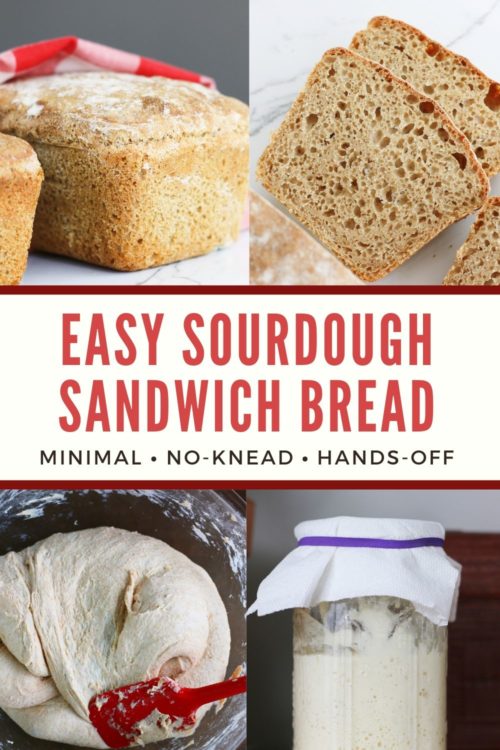
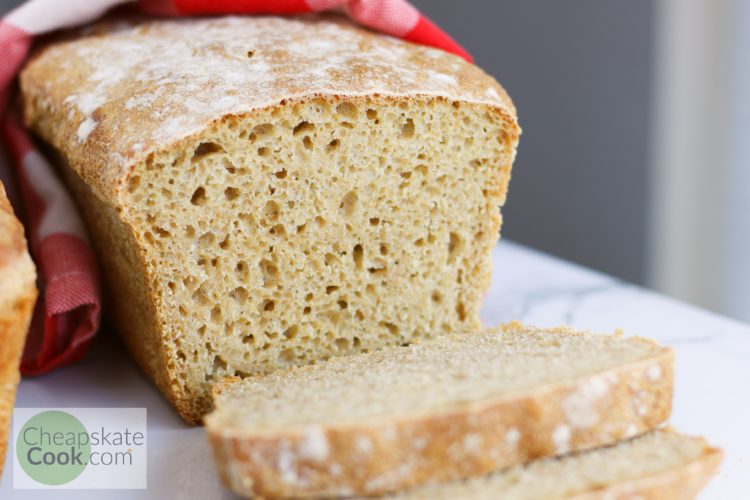
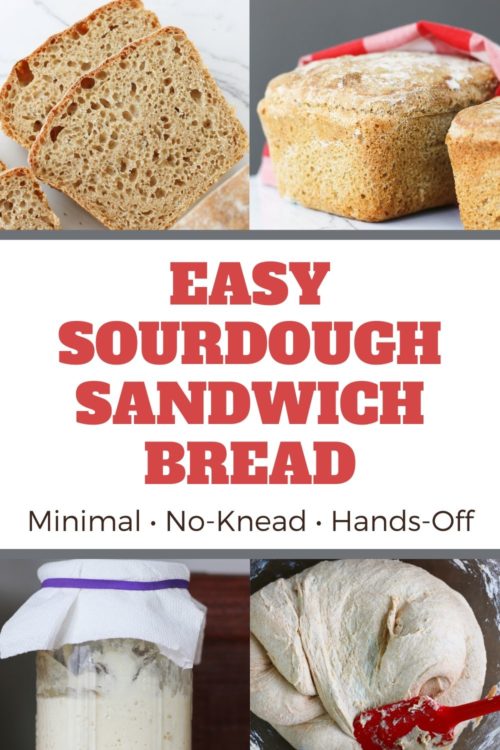
A simple, no-knead, hands-off sourdough sandwich bread recipe that’s delicious, tangy, and made with only 4 ingredients!
This post may contain affiliate links. Read my disclosure policy here.
Have you ever felt overwhelmed and a little terrified of learning a new skill?
I felt this way about learning to drive, taking calculus (which is why I skipped it – zero regrets), and making sourdough.
Actually, I wasn’t even scared of making sourdough bread. It was the starter that intimidated me.
I’ve been making bread from scratch for most of my life, but a sourdough starter sounds like keeping a pet. Feeding? Hibernating? Starving? What?
Make Your Own Sourdough Starter
While this post is not a tutorial about how to make your own sourdough starter, I want to first point you to one of the queens of traditional sourdough baking, my friend Wardee, from Traditional Cooking School.
My friend Wardee shares A LOT of information (and videos!) about healthy sourdough. Here are some of her tips:
- How to Start a Sourdough Starter
- Healthiest Bread Ever (free webclass!)
- 11 Tips for Lighter, Less Dense Sourdough
- Sourdough A to Z (eBook & Video)
I demonstrated how I feed my sourdough starter LIVE on Instagram and Facebook here:
- Watch the Facebook replay here!
- And I shared a very short demo of how I feed my sourdough starter on IGTV.
My best advice: Give yourself grace, keep trying, and you will succeed. Like any new skill – such as staying 6 feet apart, not touching your face, washing your hands (apparently that’s new too?) – you will get better and better until making sourdough bread is second nature.
Easy Sourdough Bread
Okay, last week I shared the easiest sourdough bread EVER. It’s just mix, rise, pour, bake. If you don’t believe me, go check it out. No kneading, no autolyzing the dough, no bench scrapers or bannetons or dutch ovens or shaping the loaves or a million other things that make sourdough bread so intimidating.
We slice it for soup or cut it through the middle and make flatbread sandwiches. But most often, we just tear off pieces with our hands and eat it plain.
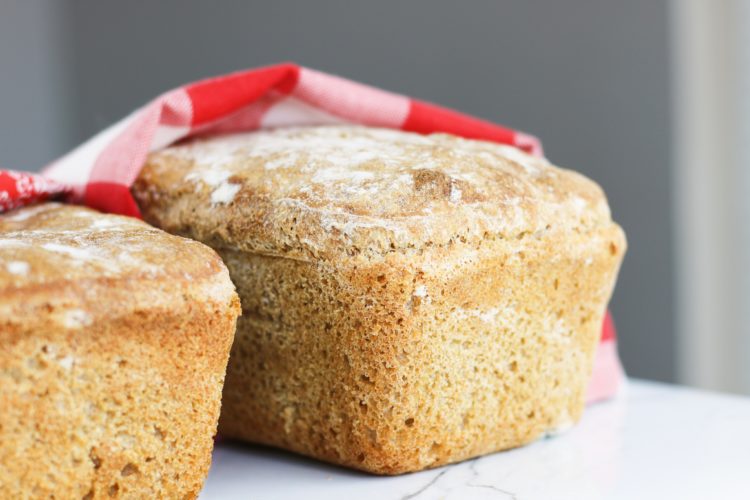
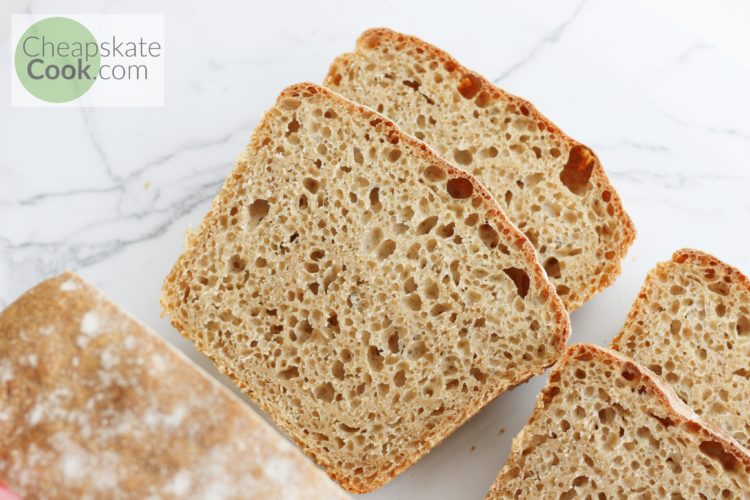
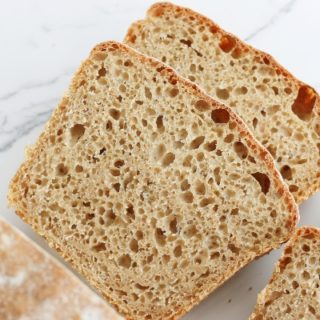
Easy Sourdough Sandwich Bread
Honestly, 90% of the time, that sourdough flatbread recipe works perfectly for us. But sometimes you want a sandwich loaf. Maybe you don’t have space to store flatbread. Maybe you don’t like eating sandwiches basically made with crust pieces all the time. Maybe you just love a good sandwich loaf.
That’s what this sourdough bread recipe is for. You take THE EXACT SAME INGREDIENTS from the Easy Sourdough Flatbread recipe and mix them slightly differently, then bake it in loaf pans. That’s it! You can add more steps and ensure a loaf that rises better and turns out even more consistently. But this recipe is stripped down to the basics so you can bake sourdough without too much fuss.
Someday I’ll share a more complicated sourdough bread recipe, but today, I want to give you a quick win you can be proud of.
Keep in mind that this bread does not rise very high. To do that, we need a few more steps and maybe some different ingredients. I just wanted to show you how you can use one recipe in multiple ways.
It’s a quick win when you want to bake sourdough sandwich bread on a budget.
Sourdough Without Kneading
I mentioned this in the last sourdough recipe, but no-knead recipes are very important to me. Not everyone has a Bosch mixer (though I want one), a bread machine, or a Kitchen Aid mixer. And not everyone wants to knead bread every time they want a loaf of bread – especially if you’re trying to bake all of your family’s bread.
So this recipe is one of those. Minimal ingredients (only 4!), and no kneading. I have another soft, squishy sourdough sandwich bread recipe that requires kneading and is more of a classic sandwich loaf. But this is an EASY, no-knead, minimal sourdough sandwich bread recipe.
How Sourdough Bread is Made
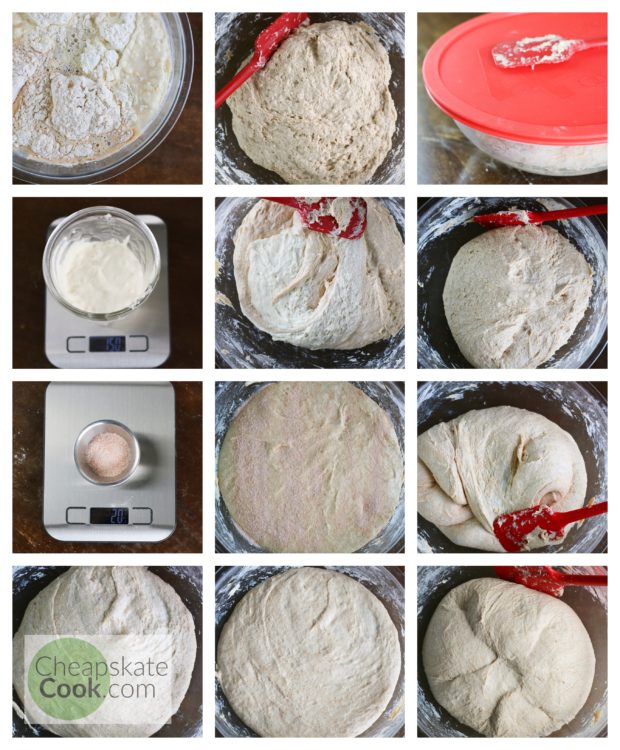
I’ll share step-by pictures, but here’s the quick rundown for this bread recipe:
- First, feed your starter and set it on the counter.
- Wait 8-12 hours, until it has at least doubled its size.
- Then mix the flour and water. Let it sit 20 minutes.
- Add the sourdough starter and let it sit for another 20 minutes.
- Add the salt and let it sit another 20 minutes.
- Give it one more good mix, then let it rise for at least 5 hours, but up to 8 (you can let it rise in the fridge overnight)
- Gently separate it into two loaf pans and let it rise for 2-4 hours.
- Bake at 350 F for 35 minutes
- Done! Let it cool, and enjoy it.
Can Sourdough Bread Be Frozen?
Yes, you can freeze sourdough bread. Let it cool completely – at least overnight – then wrap it tightly in plastic wrap or foil. Store in a freezer bag and freeze for up to several weeks.
Will Sourdough Rise in the Oven?
One of my favorite bread-baking hacks is to let the bread rise in the oven with THE OVEN OFF and the light ON. This creates a warm environment for the yeast, which makes the bread rise faster.
If possible, use the oven method for this sourdough bread recipe. Just keep an eye on your bread in the loaf pan so it doesn’t overproof.
Will Sourdough Rise in the Fridge?
If it works better for your schedule, you can let the sourdough sandwich bread rise in the oven overnight during either of the longer rises. Every fridge and bread loaf is different, so it will change the results, but it’s worth trying, and I’ve done it many times.
Sourdough with Whole Wheat Flour
You can make this bread with whatever you have on hand. I make it with whole wheat flour, white wheat flour, spelt flour, and plain unbleached white flour. Usually, I use a combination of flours.
Each flour makes a slightly different bread loaf. If I was extremely type-A, I would run a series of tests and tell you exactly how much of each flour to use to make optimal bread loaf. However, in real life, I can never guarantee exactly what flours I have on hand. So I can only hope that you’re a little bit of a hot mess like me and might appreciate a bread recipe that doesn’t have to be perfectly precise.
Sourdough with Spelt Flour
Like I said, I use spelt flour in this recipe too, which can be better for gluten-sensitive stomachs. Try it with plain spelt flour, freshly ground spelt flour, or sprouted spelt flour.
Sourdough with Yeast
Maybe you have a very young sourdough starter (less than 2 months old) or a very weak one (maybe it sat in the back of the fridge and you forgot to feed it for a couple months until you found it last week and hoped you could coax some life back into it. Ask me how I recognize this scenario). You might want to add some plain instant yeast to your recipe.
If you aren’t confident in your sourdough starter’s ability to rise, dissolve 1 teaspoon of yeast into 2 tablespoons of water and add it at the same time as the sourdough starter. Add 1/3 cup of flour too, in order to rebalance the dry and wet ingredients. This will make the bread rise faster, so watch it.
This Sourdough Sandwich Bread Recipe is:
- Simple
- Minimal
- 4 Ingredients
- Low-maintenance
- Budget-friendly
- Unfussy (as far as sourdough goes)
- Delicious
- Tangy
- Does not crumble!
Sourdough Equipment
I don’t think you need a lot of special equipment to make good bread.
There is one piece of equipment, however, that makes all the difference. I resisted buying it for years, but when I finally did, my sourdough bread went from, “Ugh, why can’t I get it to just turn out right?” to “Not to brag or anything, but this is the best bread on the planet.”
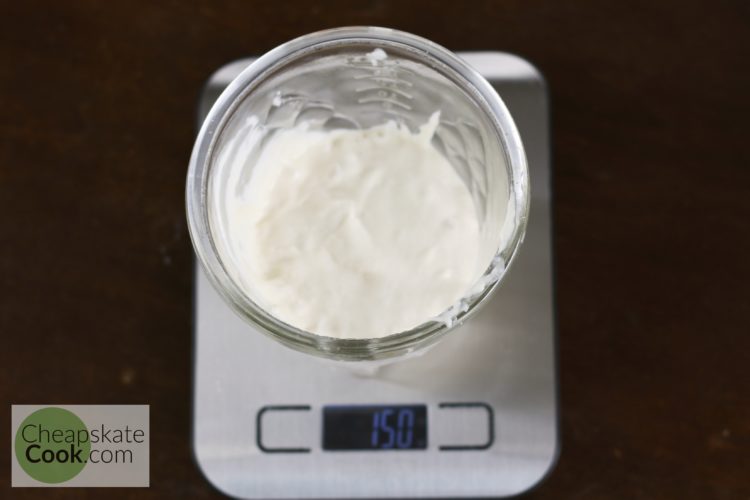
Using a food scale not only helps you take really good care of your starter (so you can feed it equal amounts of water and flour), but it frees you to accurately weigh the liquids and flours in your bread recipes – which makes bread-baking easier (no more checking for the right texture as you stir) and makes it turn out better.
And this coming from someone who prefers to eye-ball rather than measuring ingredients. Using a food scale is far easier than using measuring cups.
You can still make very decent bread without a food scale. I’m just saying it’s a lot easier with a food scale.
Easy Sourdough Bread Recipe
When making easy sourdough bread, I use 1000 grams (about 10 cups) of any combination of flours: whole wheat, spelt, white, etc. Then I add 800 grams (about 3 1/3 cups) of room temperature water, 150 grams (about 3/4 cup) of sourdough starter, and 20 grams (about 2 1/2 teaspoons) of salt. I use this combination to make all kinds of sourdough – flatbreads, sandwich loaves, artisan rounds, and this past week, I used it to make sourdough beignets.
It’s a good, versatile dough. The only difference between all those recipes is what I do with the dough. How long do I let it proof? Do I add all of the ingredients at once or let the dough rest in between each ingredient? It sounds strange, but these things make all the difference. My favorite part of this recipe is that I only need to know these ingredients in order to make a huge variety of baked goods.
If you try this recipe, let us know! Leave a comment, rate it, and tag a photo #cheapskatecook and @cheapskatecook on Instagram.
Easy Sourdough Sandwich Bread
A simple, no-knead, hands-off sourdough sandwich bread recipe that’s delicious, tangy, and made with only 4 ingredients!
Ingredients
- 4 cups whole wheat flour*, 500 g
- 4 cups white flour*, 500 g
- 3 1/3 cups water, 800 g
- 3/4 cup sourdough starter, 150 g
- 2 1/2 tsp salt, 20 g
Instructions
- The night before baking the bread, feed your sourdough starter. Use 2 tbsp of starter and feed it 3/4 cup (90 grams) white unbleached flour and 6 tablespoons (90 grams) water. Cover it and let it sit on the counter overnight.
- The next morning, stir the flour and water together in a large glass bowl. the dough will be stiff. You don't have to mix it completely. This step is called the autolyze, and it helps make a better sourdough loaf without adding much extra effort! Turn on the light in your oven, but keep the oven OFF. Cover the bowl and set it in the oven. This helps create a warm environment so the yeast can activate. If you can, put a piece of tape or a post-it note on oven controls so no one accidentally turns it on (ask me how I learned this trick). Let it rest for 20 minutes.
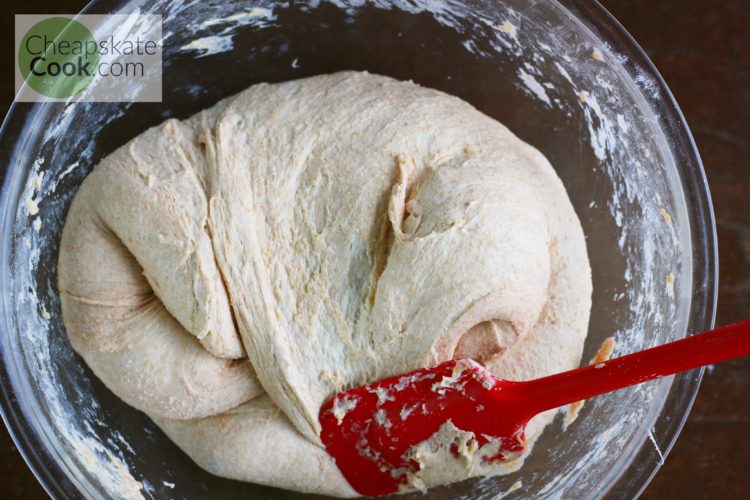
- After your 20-minute timer goes off, remove the bowl from the oven and add the sourdough starter. I've found that rather than stirring it with a wooden spoon, a sturdy rubber spatula works even better: with the spatula, scrape the dough away from the walls of the bowl and fold it in on itself. Mix the entire loaf this way, until the dough is mostly uniform in color and texture. It should only take a minute or two. The dough will be very wet, and it's okay if the sourdough starter isn't completely mixed in yet.
- Cover the bowl and place it in the oven again. Set your timer for 20 minutes and let the dough sit.
- Now it's time to sprinkle in the salt. Just sprinkle it across the top of the dough instead of dumping it into a little pile. This will help it mix into the dough more easily. Now stir the bread again, just like you did before - scraping the dough away from the walls of the bowl and folding it in on itself. Mix the entire loaf this way, until the dough is mostly uniform in color and texture.
- Cover the bowl and place it in the oven again. Set your timer for 20 minutes (last time, I promise) and let the dough sit.
- By now, you should notice the dough is beginning to poof up a little. Give it one more gentle mix using that same scraping motion. If possible, use the spatula to tuck the folded ends of the dough underneath so you get a nice smooth surface. The dough will still be very wet.
- Cover the bowl, set it back in the oven and let it sit for at least 4-5 hours. If you need to, you can leave it overnight in the fridge instead then pick up the following instructions the next morning (just another option to make it work for your schedule).
- Generously grease two loaf pans. Spread some butter or coconut oil on your hands so the dough doesn't stick to them. Dust some flour on the counter and pour the dough out on to the counter. Use a thick spatula to divide the dough in half as best you can (it will be wet). Gently fold each half into thirds, making a rectangle-ish shape (it will probably be messy - it's okay!) and place them in the loaf pans.
- Put the loaf pans back in your oven (you don't need to cover them if they are rising in the oven) with the light on and the oven OFF. Let them rise for about 1 hour. Check on them. Depending on the type of flour and how strong your starter is, they might be proofed enough to bake. If not, let them proof for another hour or two. Keep in mind they won't rise too much. This is a very wet dough, so you don't want them to rise too high or they will spill over the sides.
- The proof test: gently poke your finger into the dough. If it leaves a big dent, the dough is not ready. If it bounces back immediately, the dough is not ready. When it bounces back a little bit, but still leaves a little dent, the bread is ready to bake.
- Take the loaf pans out of the oven and place them on the stovetop. Remove the tape or post-it note on the oven controls, and preheat the oven to 350 F. Set a timer for 20 minutes.
- After 20 minutes, place the loaves in the oven and bake them for 15 minutes, then turn the loaves so the fronts are facing the back of the oven. This will help them bake evenly. Bake for another 15-20 minutes, until the crust is golden brown.
- Remove sourdough loaves from the oven and let them cool for at least 10 minutes. Turn the loaves over and remove them from the pans and onto a cooling rack or cutting board to finish cooling.
- It's super tempting, and I don't expect you to follow this advice (I rarely do), but try to let the bread cool for another hour or so before slicing, This helps improve the texture of the loaves.
Notes
*Flour
You can make this bread with whatever you have on hand. I make it with whole wheat flour, white wheat flour, spelt flour, and plain unbleached white flour. Usually, I use a combination of flours.
Freeezing Instructions
Let it cool completely - at least overnight - then wrap it tightly in plastic wrap or foil. Store in a freezer bag and freeze for up to several weeks.
If You Don't Want to Let it Rise in the Oven
That's okay! Just try to set it someplace warmish but not too warm (around body temperature is ideal). I put it on my patio table in the warm Summer months. If it's not warm, it will just take longer to rise. No harm done.
Fridge Rising
If it works better for your schedule, you can let the sourdough sandwich bread rise in the oven overnight during either of the longer rises. Every fridge and bread loaf is different, so it will change the results, but it’s worth trying, and I’ve done it many times.
Adding Yeast
Maybe you have a very young sourdough starter (less than 2 months old) or a very weak one (maybe it sat in the back of the fridge and you forgot to feed it for a couple months until you found it last week and hoped you could coax some life back into it. Ask me how I recognize this scenario). You might want to add some plain instant yeast to your recipe.
If you aren’t confident in your sourdough starter’s ability to rise, dissolve 1 teaspoon of yeast into 2 tablespoons of water and add it at the same time as the sourdough starter. Add 1/3 cup of flour too, in order to rebalance the dry and wet ingredients. This will make the bread rise faster, so watch it.
Recommended Products
Some of these links are affiliate links. Read my disclosure policy here.

Nutrition Information
Yield 8 Serving Size 2 slicesAmount Per Serving Calories 474Total Fat 2gSaturated Fat 0gTrans Fat 0gUnsaturated Fat 1gCholesterol 0mgSodium 976mgCarbohydrates 100gFiber 9gSugar 0gProtein 16g
Please note: The actual calories and nutrition of this dish will change depending on what ingredients you use. Nutrition information is not always accurate.
More Sourdough Recipes
Need more sourdough recipe sources? I love these!
- Easiest Sourdough Bread EVER
- Ways to Use Sourdough Discard (from Cultures for Health)
- Farmhouse on Boone’s Top 10 Favorite Sourdough Recipes!
- 15 Mistakes that Most Beginner Sourdough Bakers Make
- Can I Make Sourdough Bread with No Baking Equipment?
More Simple, Clean, Bread Recipes
- Easiest Bread Ever
- Non-Crumbly Whole Wheat Sandwich Bread
- Bread Made Without Yeast
- Healthier, 1-Bowl Pumpkin Bread
- Healthier, 1-Bowl Banana Bread
What You Can Do Now:
What have you made with your sourdough starter?
If you found this post helpful, let us know! Leave a comment, share it on Facebook or Pinterest, and follow us on Instagram or YouTube for more!
Slash your grocery budget and feed your family real food! Get simple, frugal, real food menu plans every month for FREE in the Cheapskate Cooks’ 1-Min Email. Get your first one here.
I made the sourdough sandwich bread twice. Both times after the ten minute cooling in the pans the loaves were soggy in the bottom and there was visible moisture in the pans. I put the bread back in the oven without the pans to dry them out and it sort of worked but do you have advice for avoiding that wetness to begin with?