
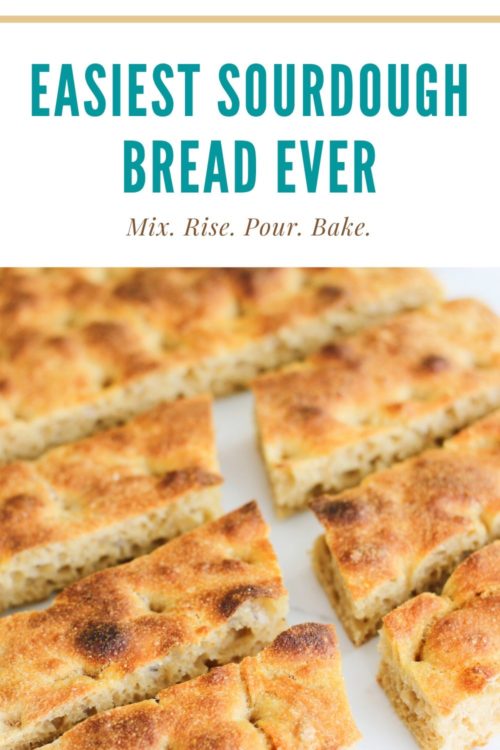
Need an EASY sourdough bread recipe? This one is simply: mix, rise, pour, and bake! Sound too good to be true? Keep reading.
This post may contain affiliate links. Read my disclosure policy here.
If you like this recipe, you’ll love my Sourdough Tips & Recipes!
Welcome to the end of your sourdough dilemmas. If you’ve been trying to get into baking sourdough bread, but you find it too intimidating, I’m going to fix all of your problems today.
This is the easiest sourdough bread you will ever bake.
It’s also one of the most delicious breads you will ever bake.
While I love making a good round sourdough boule, and I love sourdough sandwich bread, this recipe is the clear winner. It is delicious, cheap (4 ingredients!), easy to make, and it takes minimal mental energy – which let’s be honest, the mental energy is the most challenging part of learning how to bake sourdough bread.
How to Make Your Own Sourdough
Anyone who has ever tried making their own sourdough starter has asked these questions:
“Is it supposed to look this runny?”
“Are there enough bubbles?”
“Am I going to make sourdough bread or give everyone food poisoning? Why is the liquid on the top black?! “
It’s a lot of new information and a completely new way of baking bread.
If you are starting to make sourdough bread, the best sourdough advice I can give you is here.
My friend Wardee shares A LOT of information (and videos!) about healthy sourdough. Here are some of her tips:
- How to Start a Sourdough Starter
- Healthiest Bread Ever (free webclass!)
- 11 Tips for Lighter, Less Dense Sourdough
- Sourdough A to Z (eBook & Video)
I demonstrated how I feed my sourdough starter LIVE on Instagram and Facebook here:
- Watch the Facebook replay here!
- I shared a short demo of how I feed my sourdough starter on Instagram.
- And here’s a quick demo of me shaping this bread on Instagram Reels!
Most importantly: Give yourself grace, keep trying, and you will succeed. Like any new skill, you will get better and better until making sourdough bread is second nature.
Easy Sourdough Bread Recipe
When you first start baking sourdough, you need an easy win. You need something that will show you that you CAN make sourdough, and you can do it without a complicated recipe that uses techniques you’ve never tried and equipment you’ve never bought – a banneton, bread lame, dutch oven, a bench scraper? When did benches get involved?
This bread recipe is a simple process that is so easy and delicious that I still use it all the time at my house – even though I have a banneton and bench scraper. It has that signature sourdough tang, a satisfyingly crunchy crust, and requires absolutely no kneading!
No-Knead Easy Sourdough Bread
No-knead bread is really important to me.
I’ve had a heavy-duty Kitchen Aid mixer for almost 10 years, and it helps me knead bread (although now I know a Bosch would do a better job). Personally, I love kneading bread by hand. It’s very satisfying and a good arm workout. But I don’t want to do it everytime I make a loaf of bread.
Kneading gets old fast – especially when you have a hungry family who eats a loaf of bread in one lunch’s worth of sandwiches. So this recipe does not require any kneading. In fact, all you have to do is mix the ingredients, let them sit and proof/rise for a few hours, pour it into a pan, and bake.
Whole-Grain Sourdough Bread
You can make this sourdough bread with white flour, whole wheat, spelt, or a combination of the two. Each type of flour absorbs the water differently, so you will get different results from each one. However, they have been consistent enough for me that I use the same recipe no matter which flour I use. Right now I use a white unbleached flour sourdough starter and a combination of whole wheat and spelt flour for the dough.
I never measure exactly how much wheat vs. spelt I use. It’s always random, and it turns out great. So don’t worry! Use what you have.
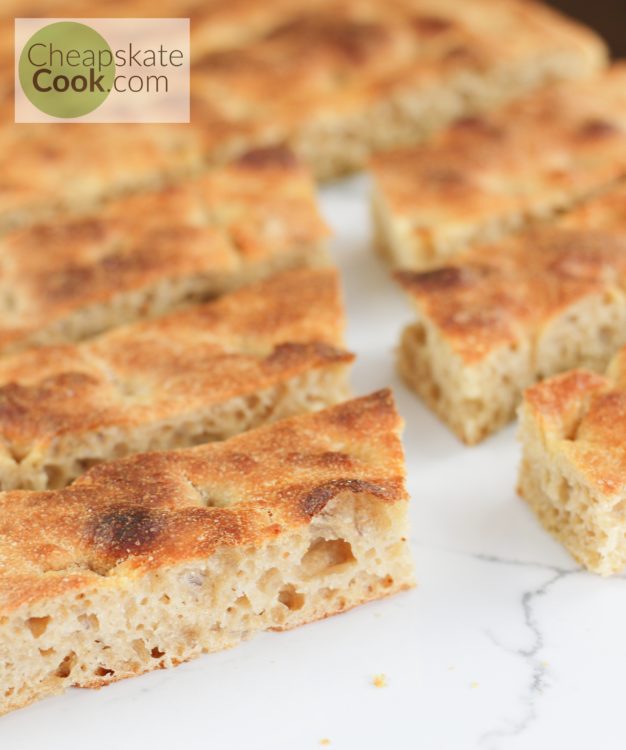
Flatbread Sourdough Recipe
The reason this bread is so forgiving and so easy to make is that we aren’t trying to make sandwich bread or a round artisan loaf with leaves carved into the crust. We’re just trying to make something simple that we can serve alongside soup or make into sandwiches and don’t have to stress too much if it doesn’t rise properly or we don’t shape it correctly.
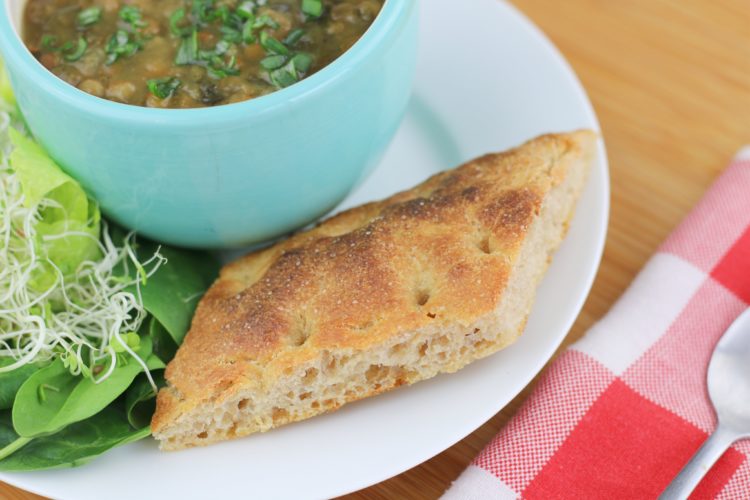
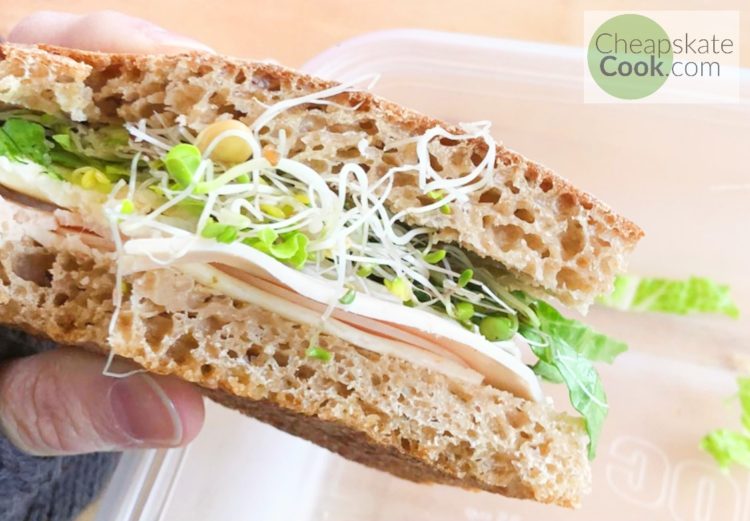
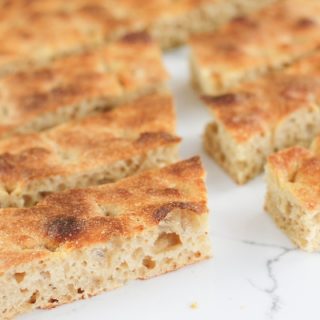
This recipe is similar to flatbread, or Focaccia, so you can bake it, then slice the bread in half crosswise and fill it with sandwich stuff. Or cut it into rectangles and serve it with soup or pasta or roast and veggies.
Or do what we animals do at the Jenkins’ house – rip it apart with our hands and eat it plain.
Do what makes you happy: because the fact you just baked delicious sourdough bread with just a few minutes of your time should make you very happy.
What You Need to Make Sourdough Bread
I hope you can tell from my rant about bread lames and bench scrapers that I don’t think you need a lot of special equipment to make good bread.
There is one piece of equipment, however, that makes all the difference. I resisted buying it for years, but when I finally did, my sourdough bread went from, “Ugh, why can’t I get it to just turn out right?” to “Not to brag or anything, but this is the best bread on the planet.”
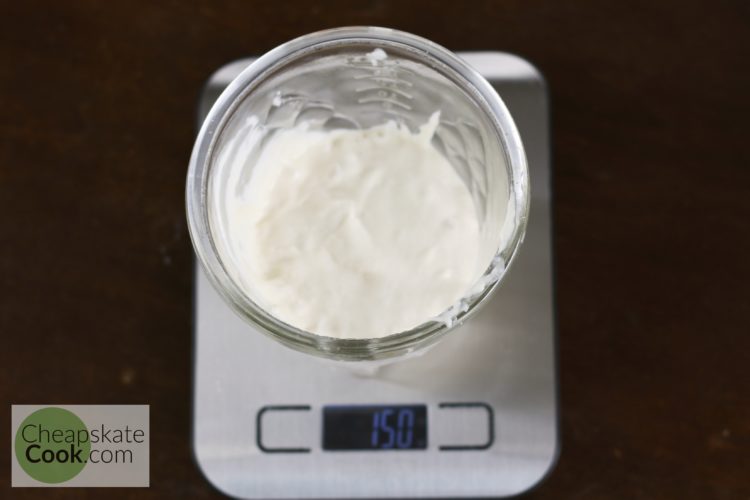
Using a food scale not only helps you take really good care of your starter (so you can feed it equal amounts of water and flour), but it frees you to accurately weigh the liquids and flours in your bread recipes – which makes bread-baking easier (no more checking for the right texture as you stir) and makes it turn out better.
And this coming from someone who prefers to eye-ball rather than measure ingredients. Using a food scale is far easier than using measuring cups.
You can still make very decent bread without a food scale. I’m just saying it’s a lot easier with a food scale.
Easy Homemade Sourdough
When making easy sourdough bread, I use 1000 grams (about 10 cups) of any combination of flours: whole wheat, spelt, white, etc. Then I add 800 grams (about 3 1/3 cups) of room temperature water, 150 grams (about 3/4 cup) of sourdough starter, and 20 grams (about 2 1/2 teaspoons) of salt. I use this combination to make all kinds of sourdough – flatbreads, sandwich loaves, artisan rounds, and this past week, I used it to make sourdough beignets. It’s a good, versatile dough. The only difference between all those recipes is what I do with the dough. How long do I let it proof? Do I add all of the ingredients at once or let the dough rest in between each ingredient? It sounds strange, but these things make all the difference. My favorite part of this recipe is that I only need to know these ingredients in order to make a huge variety of baked goods.
For now, this is the easiest bread you can make, and I love it so much (both for its ease and its taste) that I make it more than any other bread recipe.
This Easy Sourdough Bread Recipe is:
- Simple
- Whole Grain
- Budget-Friendly
- Real Food
- Good for some gluten-intolerances or low FODMAP diets
- Long-ferment Sourdough
- Dairy-free
- Egg-free
Easy Sourdough Bread Step-By-Step:
Here’s how to make the easy sourdough bread step-by-step.
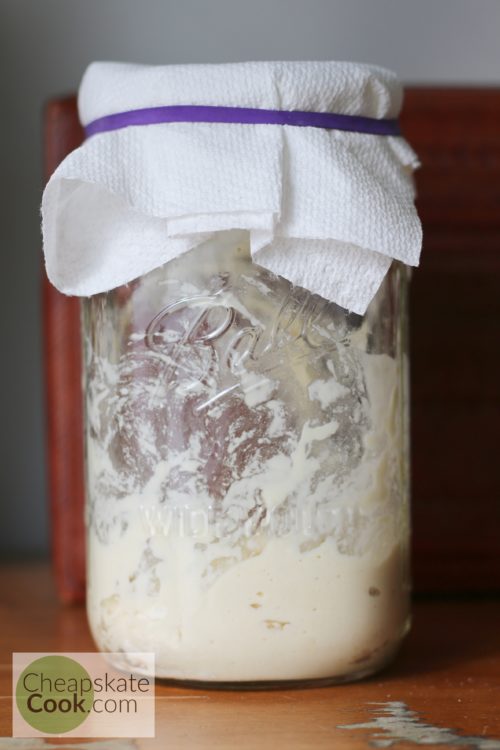
The night before baking the bread, feed your sourdough starter. Use 2 tbsp of starter and feed it 3/4 cup (90 grams) white unbleached flour and 6 tablespoons (90 grams) water. Cover it and let it sit on the counter overnight.
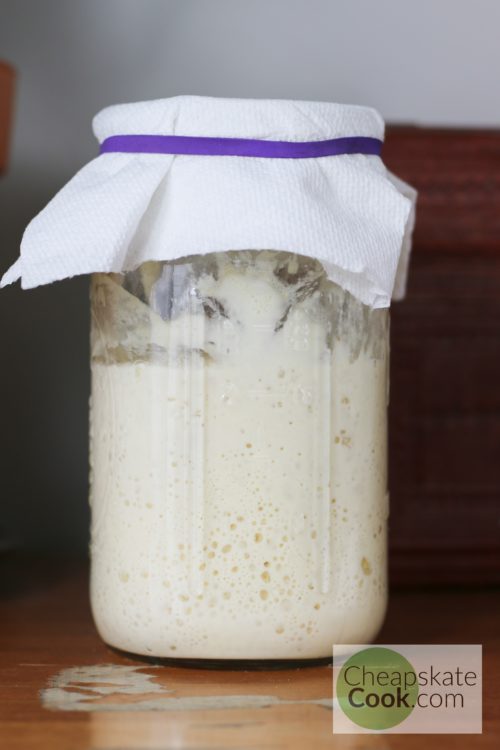
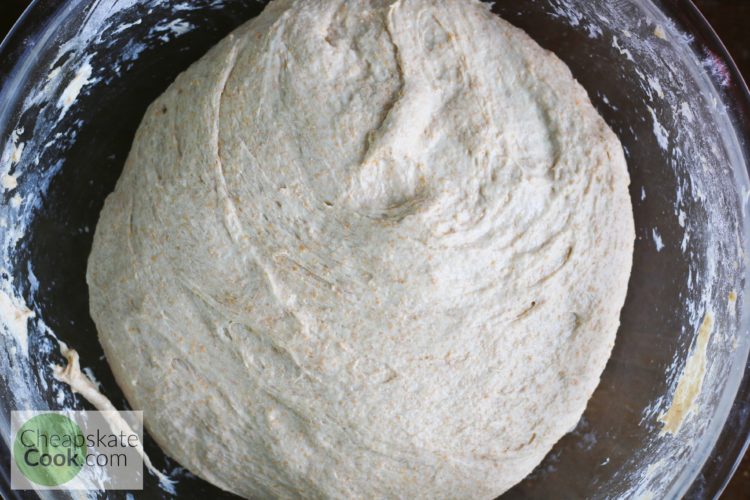
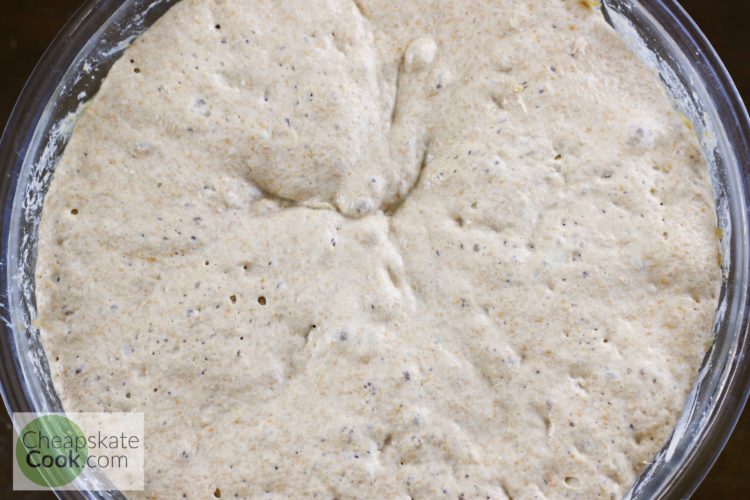
The next morning, the sourdough starter should have at least doubled in height.
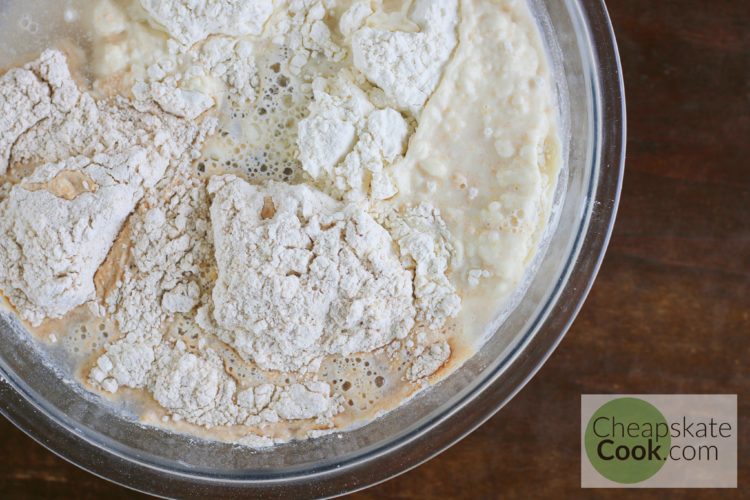
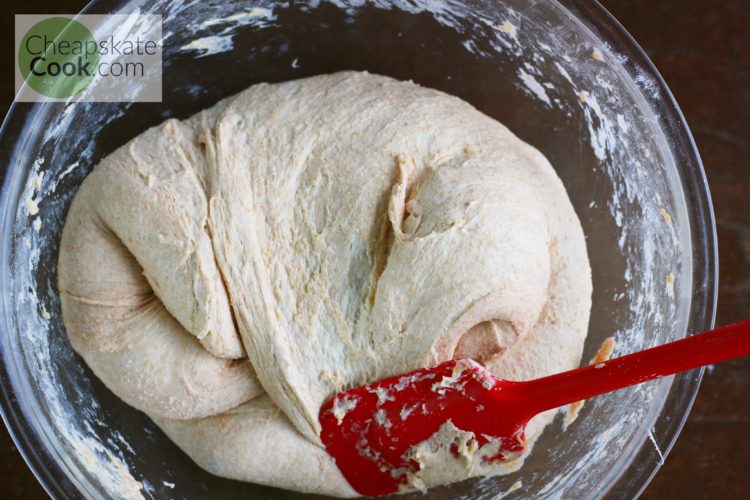
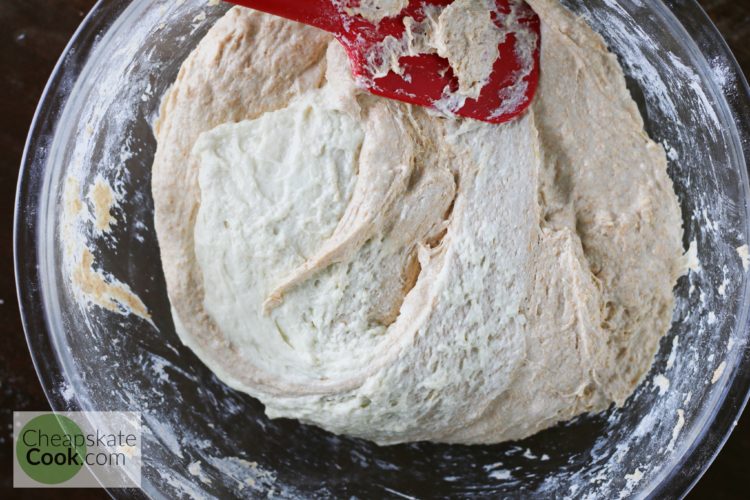
In a large glass bowl, stir together the flour, water, 3/4 cup starter, and salt. I’ve found that rather than stirring it with a wooden spoon, a sturdy rubber spatula works even better: with the spatula, scrape the dough away from the walls of the bowl and fold it in on itself. Mix the entire loaf this way, until the dough is uniform in color and texture. It should only take a minute or two. The dough will be very wet.
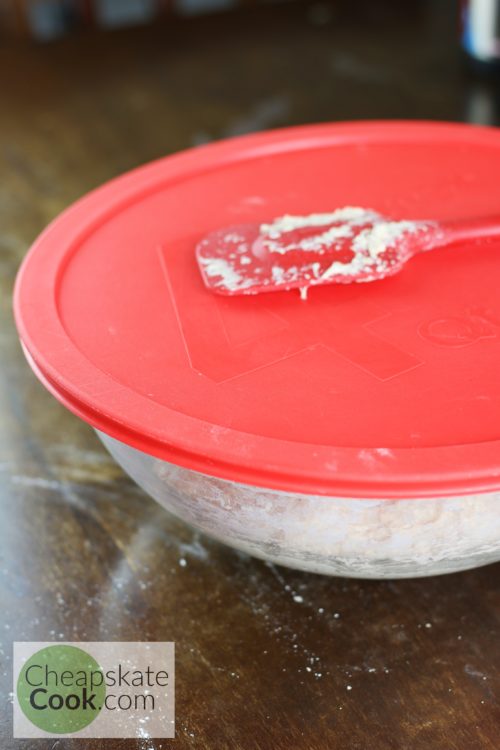
Cover the bowl and let it sit for at least 5 hours or up to 10. I let it rise in my oven with the light on (oven is OFF) so it stays nice and warm. This helps it rise faster too. If you can, put a piece of tape or a post-it note on oven controls so no one accidentally turns it on (ask me how I learned this trick).
Set out two large baking sheets and drizzle them generously with oil. Use your hands to spread the oil evenly on the pan so the dough doesn’t stick. With your oiled hands and a thick pancake turner, divide the dough in half as best you can (it will be wet), and gently pour each half onto the baking sheet.
Use your hands to gently spread the dough out on the baking sheet. Don’t rip the dough or smash it too much. The best word I can think to use is squoosh. Squoosh the dough gently with the tips of your fingers until it stretches across the whole baking sheet.
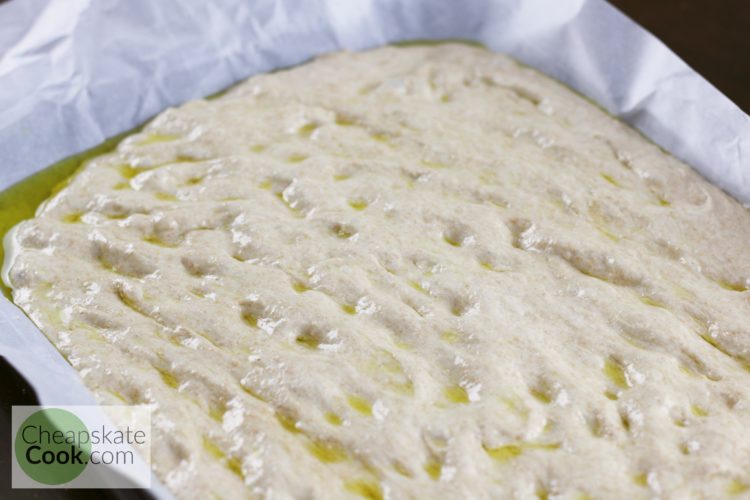
Also, parchment paper is completely optional. I reuse mine, and it makes cleanup a breeze.
Preheat the oven to 450 F. Set a timer for 20 minutes.
Bake the bread on separate racks of the oven for 15 minutes. Then switch racks and turn the baking sheets so the parts of the loaves that were in the back of the oven are now facing the front. This will help them bake evenly. Bake for another 10-15 minutes, until the crust is golden brown.
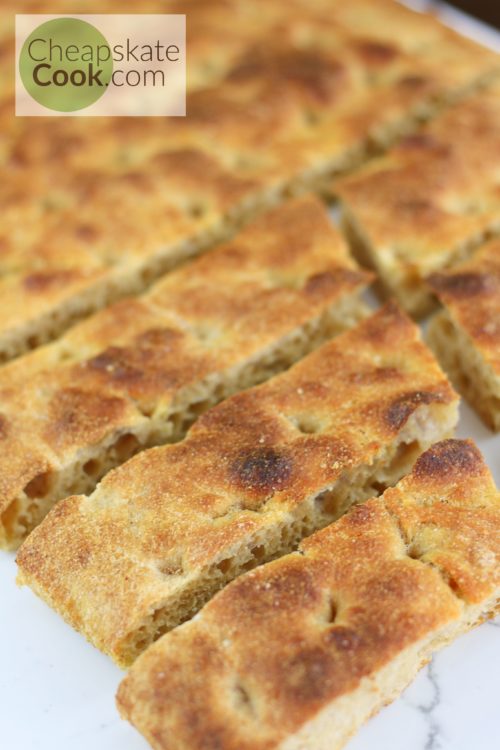
Remove flatbread from the oven and let it cool for at least 20 minutes. Slice and serve. You can also cut it in half crosswise and make flatbread sandwiches.
Budget-Friendly Sourdough Bread
Here’s how this recipe helps us save money and eat healthy!
- Good bread is expensive – $5-$10 a loaf where we live. And it’s still not as good and clean as making your own.
- This sourdough bread costs pennies per loaf and is easy enough to make that it replaces most of our need for buying bread at the grocery store – and I don’t spend all my time baking bread.
- Generally, people seem to agree that long-ferment sourdough is better for you than bread made with instant yeast, and this sourdough bread uses whole grains.
- If you have a gluten intolerance, you may be able to handle long-fermented sourdough bread!
Not only is this the easiest sourdough bread you will ever make, but it’s also a long-ferment, flexible recipe (need it in 4 hours? Need to let it sit overnight? No problem) that tastes amazing. It might not have a leaf carved into the dutch-oven baked crust, but this is bread that I feel good about making, eating, and serving my family.
More Simple, Clean Bread Recipes
- Easy Sourdough Sandwich Bread
- My Sourdough resources page
- Easy Master Bread Recipe
- Non-Crumbly Whole Wheat Sandwich Bread
- Homemade Pizza Crust
- Cinnamon Rolls
- Bread Made Without Yeast
- Healthier, 1-Bowl Pumpkin Bread
- Healthier, 1-Bowl Banana Bread
If you try this recipe, let us know! Leave a comment, rate it, and tag a photo #cheapskatecook and @cheapskatecook on Instagram.
Easy Sourdough Flat Bread
Need an EASY sourdough bread recipe? This one is simply: mix, rise, pour, and bake! Sound too good to be true? Keep reading.
Ingredients
- 4 cups whole wheat flour*, (500 g)
- 4 cups white flour*, (500 g)
- 3 1/3 cups water, (800 g)
- 3/4 cup sourdough starter, (150 g)
- 2 1/2 tsp salt, (20 g)
- A generous drizzle of olive oil, for baking, (or avocado oil)
Instructions
- The night before baking the bread, feed your sourdough starter. Use 2 tbsp of starter and feed it 3/4 cup (90 grams) white unbleached flour and 6 tablespoons (90 grams) water. Cover it and let it sit on the counter overnight.
- The next morning, the sourdough starter should have at least doubled in height. In a large glass bowl, stir together the flour, water, 3/4 cup starter, and salt. I've found that rather than stirring it with a wooden spoon, a sturdy rubber spatula works even better: with the spatula, scrape the dough away from the walls of the bowl and fold it in on itself. Mix the entire loaf this way, until the dough is uniform in color and texture (you can also use your hands - it will be sticky and messy but it totally works!). It should only take 1-2 minutes. Dough will be very wet.
- Cover the bowl and let it sit for at least 6 hours or up to 10. I let it rise in my oven with the light on (oven is OFF) so it stays nice and warm. This helps it rise faster too. If you can, put a piece of tape or a post-it note on the oven controls so no one accidentally turns it on (ask me how I learned this trick).
- Layout two large baking sheets and drizzle them generously with oil. Use your hands to spread the oil evenly on the pan so the dough doesn't stick. With your oiled hands and a thick pancake turner, divide the dough in half as best you can (it will be wet), and gently pour each half onto the baking sheet.
- Use your hands to gently spread the dough out on the baking sheet. Don't rip the dough or smash it too much. The best word I can think to use is "squoosh." Squoosh the dough gently with the tips of your fingers until it stretches across the whole baking sheet.
- Preheat the oven to 450 F. Give it a good 20 minutes to preheat thoroughly.
- Bake them on separate racks of the oven for 15 minutes. Then switch racks and turn the baking sheets so the parts of the loaves that were in the back of the oven are now facing the front. This will help them bake evenly. Bake for another 10-15 minutes, until the crust is golden brown.
- Remove the flatbread from the oven and let it cool for at least 20 minutes.
- Slice and serve. You can also cut it in half crosswise and make flatbread sandwiches.
Recommended Products
Some of these links are affiliate links. Read my disclosure policy here.

Nutrition Information
Yield 12 Serving Size 1 gramsAmount Per Serving Calories 325Total Fat 3gSaturated Fat 0gTrans Fat 0gUnsaturated Fat 2gCholesterol 0mgSodium 489mgCarbohydrates 66gFiber 6gSugar 0gProtein 10g
Please note: The actual calories and nutrition of this dish will change depending on what ingredients you use. Nutrition information is not always accurate.
What You Can Do Now:
Have you ever baked with sourdough? Would you try this recipe?
If you found this post helpful, let us know! Leave a comment, share it on Facebook or Pinterest, and follow us on Instagram or YouTube for more!
Slash your grocery budget and feed your family real food! Get simple, frugal, real food menu plans every month for FREE in our Fresh & Frugal newsletter. Get your first one here.

What size are your baking sheets? I one I have looks much bigger than the ones in your pictures and I want to figure out if I need to adjust the recipe or find different pans.
Hi Anna, this recipe works great for my 14×10-inch pans and my 15×11-inch pans. I use either one interchangeably! Let me know how it goes for you!
Hi, I have a question about the discard. 2 questions, really. First, how long can I keep the discard in the fridge before using it? Second, can I combine discards into the same jar? Like, next time I used my starter could I put its discard in the same jar as the discard from the last time I used my starter? Thanks!